Feel like a gooseberry?
The time for making the most of British summer fruit will soon come to a close...
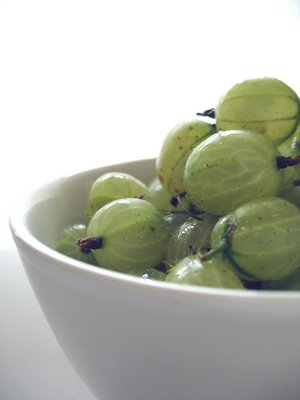
Deceptively unprickly, the gooseberry is not the easiest fruit to come by, unless you happen to have a bush in your garden, have a good farmers market nearby or frequent a really well-stocked supermarket. We've just been graced with a shiny new Waitrose full of esoteric fruit and veg, and lo and behold, their plumply English gooseberries were going cheap (as usually happens when fruit is seasonal), so meandering through the shop in a food-daze, I bought some without really thinking what I was going to do with them.
Health-wise, this somewhat odd looking green fruit has a relatively high vitamin C content packed within its taut flesh, which supposedly (unable to do my own titration test here, I can only go on what I have read) does not diminish during the cooking process, as it would with most other fruits and vegetables. Handy for our small stripy friends then, since they (like other berries in their family - blackcurrants, redcurrants and whitecurrants) need to be cooked in some kind of manner before consumption - red dessert gooseberries being the exception.
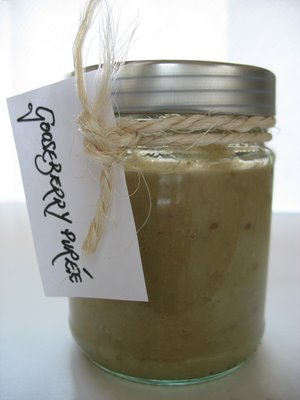
Given that the weather was not permitting hot desserts at the time I thought up this dish, and that a gooseberry fool would just be yawnsome, it occurred to me that the tart tingle of a rivulet of green running through a cool, sweet vanilla ice cream could be just the thing to refresh oneself in the summer heat. But rather than just make the puree and serve it atop a scoop, the idea of the fruit mingling sourly in with the custardy ice cream appealed to me. Thus the Gooseberry Ripple was born.
I made a puree out of the entire punnet, but you only really need a few tablespoons for the recipe. You could therefore make a very small amount (say 100g gooseberries and 1 and 1⁄2 tbsp sugar) but it's pretty easy to make up a batch and then use it in a variety of things - sandwiching sponge cakes or meringues alongside a layer of cream/mascarpone, spooned over yoghurt for breakfast, or turn it into a sorbet in itself. Or a gooseberry fool - if you really must.
Gooseberry Ripple Ice Cream
For the puree:
- 450g gooseberries, washed, topped and tailed
- 1 tbsp water
- 50g sugar
- 2 tbsp elderflower cordial
For the ice cream:
- 284ml carton of double cream (proper stuff - no Elmlea or half-fat rubbish)
- 150ml full cream organic milk
- 3 free range egg yolks
- 50g unrefined caster sugar (you can easily make this - or icing sugar - by grinding down unrefined granulated sugar in a blender or Bamix grinding mill)
- vanilla extract
If you are doing this the luddite way (like myself) make the ice cream first and then cook the puree whilst its freezing. If you're making it in a sorbetier then you'll probably want to try and make the puree first, or at the same time.
Puree:
Place the gooseberries in a heavy bottom saucepan along with the water, set on a medium high heat and cover, shaking the pan occasionally. Once the gooseberries have boiled, broken down and look pulpy, add the sugar, turn the heat down a little to a slow simmer, stir occasionally and reduce the fruit down for about 10 minutes or so until saucy. Once you take it off the heat, stir in the elderflower cordial (which is optional - don't buy any especially, although mixed with sparkling water it does form an aspirational Summer in a glass). Leave to cool a little and then pulverize with a blender until smooth, to make a thickly opaque puree. I don't care much for sieving things, but the cheffy perfectionists among you may want to strain the mixture to remove the seeds. I've specified such a small amount of sugar here because the ice cream is so very sweet, that the gooseberries provide a slightly sour and much needed contrast against it. If you make the fruit as sweet as say, a jam would be, then you may find the resulting ice cream too sickly.
Ice cream:
I've been put off making ice cream and for no good reason. The thought of making any variety of custard-based thing used to spook me. I have no idea why - maybe the horror stories of disastrous splitting, the extravagance of egg yolk usage coming from a frugal background. I can't really fathom it. Now, I've realised just how simple it is, how you really have to be quite, quite inept to mess it up and how easy it is to freeze the spare egg whites until you have enough to make a decent crop of meringues.
So: Put the cream and milk in a saucepan (or one of those nifty, wide Pyrex jugs where you can measure the ingredients, put it straight on the hob and then pour it with accuracy when needed) and heat until just below boiling point, giving a quick stir now and then. At the same time as you're heating this up, place a saucepan with an inch or so of water on to boil, making sure it is the correct size to sit the mixing bowl you will be using (for the resulting custard mix to be cooked in - you will see below) comfortably atop the pan. I use this method just to be completely confident I'm not going to split the mixture. It does require that extra bit of time and patience to reach the required consistency but is virtually fool-proof. However, the more season custard-makers among you may wish to simply pour the custard straight into a saucepan and heat it up directly, rather than use the method stated here.
Whilst that all comes up to the desired temperature, whisk the egg yolks with the sugar in a large mixing bowl until voluminously lighter in both colour and texture. Once your cream has reached the stage where it looks as though it's about to bubble, pour it in a very thin, steady stream, over the eggs, whisking the canary-coloured concoction constantly and consistently. If think your bowl will slip around whilst you furiously whip one-handed, just wet a piece of kitchen paper, wring it out and it place underneath your awaiting mixing vessel.
Once you have poured all the cream in, continue to whisk away for a little bit, and if you're suspicious that there may be a few cooked eggy bits straggling around the bottom (this is where a see-through mixing bowl pays off), sieve the custard into another bowl - being aware that this one will now need to also be a good fit over the saucepan. Don't panic if it's not - just pour it back into the first one.
When your saucepan with water is at a simmering point, place the bowl with the soon-to-be custard on top of it and stir continuously. Silicone spatulas are an amazing breakthrough for recipes such as this, allowing you to both stir and scrape the mixture down off the sides constantly. If you don't do either of these things, the custard will cook unevenly and you'll have horrible over-cooked lumps, or a ring of crusty custard around the edges. So stir and scrape and stir and scrape and be patient. This is not the time to wander off and watch the telly. What's really important to remember here though is that you are not aiming to turn the custard into a fully-fledged, thickened sauce, but just a back-of-the-spoon-coating-consistency. Think about all the ice creams you've ever eaten where they've partially melted, and what those melty puddles were like. They were thin, almost milky, but not all that runny, no? That's all you need to thicken the custard to and no more.
Once it has reached the melted ice cream stage, just pull it off the heat, stir in the vanilla extract to your own taste and let the whole thing cool slightly. You can then proceed to churn the ice cream, following the instructions according to your ice cream maker, drizzling in the gooseberry puree once it's just about solid enough to marble through. If you're worried it will blend it in too thoroughly, do this last stage by hand once you've transferred the ice cream to its awaiting container.
If you are doing this all without mechanical assistance, pour the custard into some Tupperware, or other freeze-able container (preferably one with a lid). Place in the freezer and then check on it an hour or so later, forking the frozen edges back in with the liquidy middle. Continue to do this every hour/ hour and a half, until you end up with the nearly perfect ice-cream texture - before it's too solid, but whilst it's still moveable enough to mix around. It will probably take about 3 to 4 hours in all. At this stage, drizzle in blobs of the gooseberry sauce and pull through the ice cream with the handle of a teaspoon until it's rippled through. Let this freeze solid now.
I'd always ignored the instruction to move ice cream to the fridge half an hour or so (depending on how cold your fridge is) before you want to serve it, but it makes the whole dishing-up process much easier, and the ice cream is at the perfect density to eat enjoyably, consistently throughout the ice cream, opposed to all melty around the outside of the tub and ice-hard in the middle. Plus, if you then put the tub back in the freezer, it retains the texture that you so patiently created without hardening up around where it may have melted had you left it out in the kitchen to soften. So do it. You'll love it so much more.
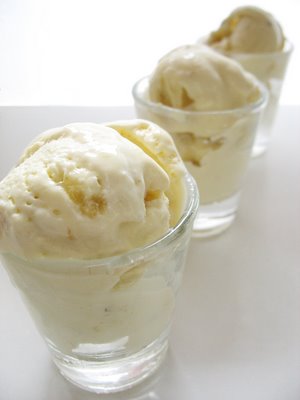
So there you go: more subtle than its raspberry contemporary in looks, but most certainly not in taste. Richly creamy yet astringent, and perfect for the summer. That's if summer ever comes back.
posted by Monaz @ 10:35 PM
3 comments
![]()
